
What is Bleed in Printing? A Beginner’s Guide to Perfect Prints
When it comes to creating professional print materials, understanding bleed in printing is essential. Bleed ensures that your designs are printed edge-to-edge without any unwanted white borders. Whether you’re designing business cards, brochures, or posters, properly setting up bleed in your files can save you from printing errors and ensure your materials look polished and professional.
This blog will walk you through what bleed is, why it matters, and how to set it up correctly for perfect prints every time.
What is Bleed in Printing?
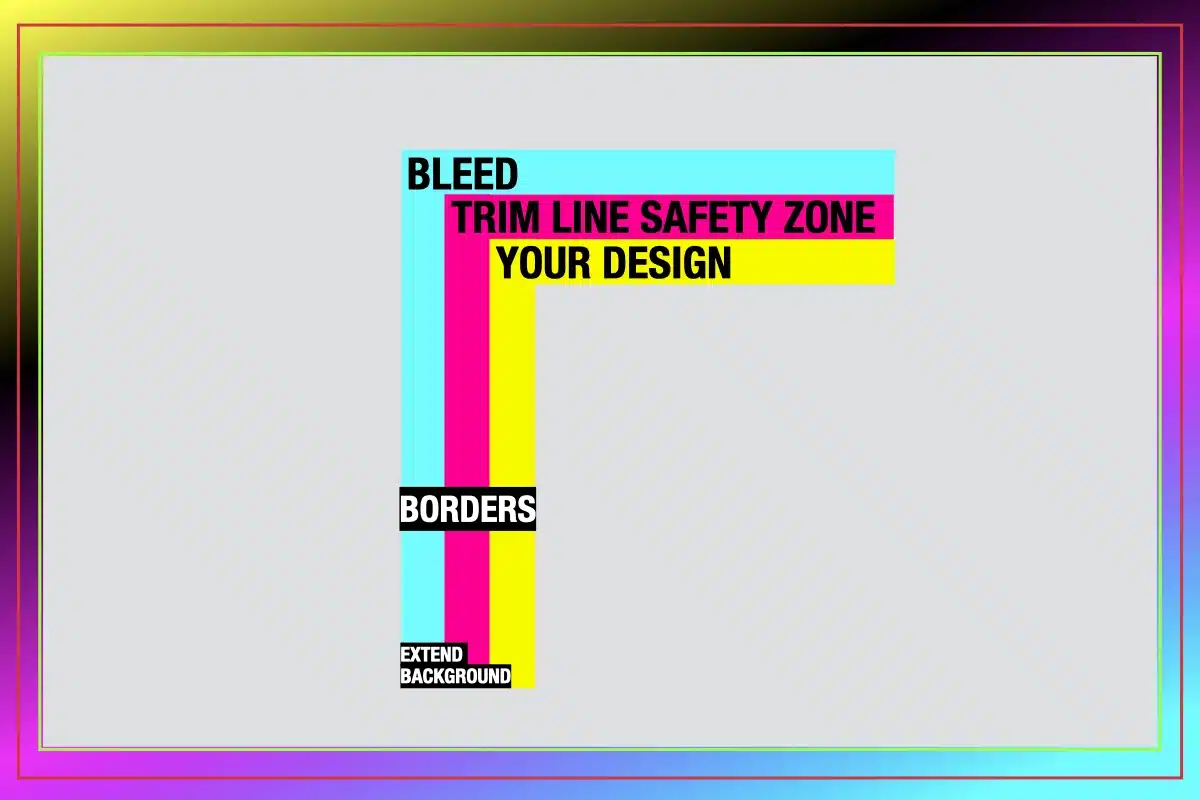
Bleed refers to the area of your design that extends beyond the final trim size of your printed material. This extra margin is necessary to account for slight cutting variations during the trimming process. By extending your design beyond the edge, bleed ensures there are no white borders or gaps around your artwork once it’s trimmed.
Example of Bleed in Action
Imagine you’re designing a flyer with a blue background. Without bleed, even a minor misalignment in trimming could result in a thin white line around the edge of the flyer. By adding bleed, your blue background extends beyond the edge, leaving no chance for white borders.
Why is Bleed Important?
1. Eliminates White Edges
Bleed ensures that your design covers the entire printed surface, eliminating the risk of unwanted white edges caused by trimming inaccuracies.
2. Professional Appearance
Print materials with proper bleed appear polished and professional, reflecting positively on your brand.
3. Saves Time and Costs
Incorrectly set up files may lead to reprints, costing you time and money. Ensuring your design includes bleed avoids such issues.
How to Set Up Bleed in Your Design
1. Know Your Printer’s Requirements
Before you start designing, check with your printer for their specific bleed requirements. Most printers recommend a bleed area of 3mm, but this can vary.
2. Use Design Software with Bleed Settings
Professional design tools like Adobe InDesign, Illustrator, or Canva often have built-in options to set up bleed. Ensure your artboard size includes the bleed area.
3. Extend Backgrounds and Images
Any background colours, patterns, or images should extend into the bleed area to ensure a seamless edge after trimming.
4. Export as a Print-Ready PDF
When exporting your file, ensure you include bleed and crop marks. This lets the printer know where to trim your design.
Common Mistakes to Avoid
1. Forgetting to Add Bleed
A common oversight is not including bleed in your design file. Always double-check before sending it to print.
2. Placing Text or Key Elements Too Close to the Edge
Keep important elements like text and logos within the “safe area,” which is at least 3–5mm inside the trim line. This prevents them from being cut off during trimming.
3. Assuming Bleed Is Optional
Bleed is non-negotiable for professional prints. Even minor misalignments during trimming can ruin your design if a bleed is not applied.
Why Choose Total Print for Your Printing Needs?
At Total Print, we understand the importance of getting your print materials right the first time. Our team ensures every file is checked for proper bleed, so your designs look flawless. Whether it’s business cards, banners, or brochures, we deliver high-quality results that reflect your brand’s professionalism.
Ready to bring your designs to life? Contact Total Print today for expert printing services that guarantee perfect results every time.